
Okay so you got a craving for onion rings. You’re thinking about ordering them at a restaurant. Stop. Just stop. Making onion rings at home is stupid easy and they taste better than anything you’ll get out. Plus you save money. Like a lot of money. This is how to make crispy onion rings that people will actually fight over.
The whole thing takes maybe 20 minutes and you end up with golden crunchy rings that taste restaurant-quality. Once you make them once you’ll never go back to ordering them out. They’re that good.
Why Restaurant Onion Rings Cost So Much
Those places charge like eight bucks for a basket of onion rings. For like three onions and some flour and oil. It’s insane. You can make like three batches at home for the cost of one restaurant order.
Plus restaurant ones sit under a heat lamp for who knows how long. By the time you get them they’re not even that crispy anymore. The ones you make at home are hot and crispy and perfect right out of the oil. There’s no comparison.
What Makes Onion Rings Actually Crispy
The secret is actually simple. You need a good batter with baking powder so it puffs up and gets light and airy. You need hot oil at the right temperature so the outside gets golden before the inside gets mushy. And you need to not overcrowd the pan so everything fries instead of steams.
That’s literally it. Do those three things and you’ll have crispy onion rings every single time.
Picking The Right Onions
Use sweet onions. Like yellow onions or Vidalia onions. Don’t use red onions because they’re too spicy and don’t work as well. Sweet onions are sweet and mellow and perfect for this.
Slice them thick enough that they stay together but thin enough that they cook all the way through. Like a quarter inch to half inch thick is perfect. Too thin and they fall apart. Too thick and they don’t cook through.
Separate out the individual rings. You’ll have some tiny ones in the middle from the center of the onion. Save those for other stuff or throw them in anyway. They fry fine just smaller.
What You Actually Need
Onions – Two or three large ones sliced into rings.
Flour – About a cup. All-purpose works perfect.
Baking powder – One teaspoon. This is what makes them light and fluffy instead of heavy.
Cornstarch – Half a cup. Makes them extra crispy.
Salt and pepper – Season it up. Garlic powder too if you want.
Egg – One. This binds the batter.
Water or milk – About a cup. Water is fine. Some people use milk or even beer for flavor.
Breadcrumbs – Optional but good. Panko if you want extra crunch.
Oil – Vegetable or canola oil for frying. You need a couple inches in your pan.
That’s everything. Pretty simple.
How To Actually Make Them
Mix The Dry Stuff
In one bowl dump your flour, cornstarch, baking powder, salt, pepper, and any other seasonings. Mix it all together.
Mix The Wet Stuff
In another bowl beat the egg. Add your water or milk. Whisk it all together till it’s mixed.
Make The Batter
Pour the wet into the dry and stir till you got a smooth batter. It should look like thick pancake batter. If it’s too thick add more water. If it’s too thin add more flour.
Dip The Onions
Take an onion ring and dip it in the batter. Make sure both sides are coated. You can use a fork to hold them. Let the excess drip off.
If you’re using breadcrumbs dip the battered ring in the breadcrumbs now. Roll it around so both sides get coated.
Heat The Oil
Pour oil in a deep skillet or pot. Like two inches deep. Turn the heat to medium-high. You want the oil at 350-375°F. If you got a thermometer use it. If you don’t, the oil is ready when you drop a tiny bit of batter in and it bubbles right away.
Fry In Batches
Don’t just dump all the rings in. Work in small batches. Like three or four at a time. Too many at once and the oil temperature drops and they get greasy instead of crispy.
Let them fry for like 1-2 minutes till one side is golden brown. Flip them with a fork or tongs. Fry the other side for another minute till it’s golden.
Drain Them
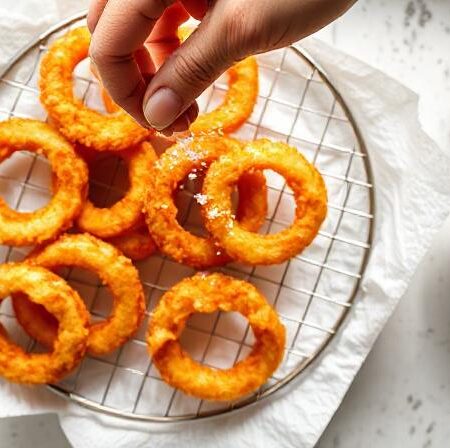
Pull them out with a slotted spoon or tongs. Put them on paper towels to drain. The paper towels soak up the extra oil.
Sprinkle salt on them right away while they’re hot. That’s when it sticks.
The Temperature Thing Is Crucial
If your oil is too hot they burn outside before cooking inside. If it’s too cold they get greasy and soggy. The sweet spot is 350-375°F. Get a thermometer if you don’t have one. It’s worth it.
The oil temperature drops when you add the cold onion rings so you gotta adjust the heat to bring it back up. Don’t just keep it on high or it’ll get too hot and burn them.
How to Make Onion Rings at Home – Easy Recipe
Equipment
- Two mixing bowls
- Deep skillet or pot
- Meat thermometer (recommended)
- Slotted spoon or tongs
- Fork
- Paper towels
- Shallow bowl for dipping
Ingredients
- 2-3 large sweet onions
- 1 cup all-purpose flour
- ½ cup cornstarch
- 1 teaspoon baking powder
- ½ teaspoon salt
- ¼ teaspoon black pepper
- ½ teaspoon garlic powder
- 1 egg
- 1 cup water or milk
- 1 cup panko breadcrumbs optional
- Oil for frying 2-3 cups vegetable or canola oil
INSTRUCTIONS
- 1. Slice onions into 1/4-1/2 inch rings, separate individual rings
- 2. In bowl 1: Mix flour, cornstarch, baking powder, salt, pepper, garlic powder
- 3. In bowl 2: Beat egg and whisk in water
- 4. Combine wet and dry ingredients, stir until smooth batter forms
- 5. Heat oil to 350-375°F in deep skillet
- 6. Dip onion rings in batter, coat thoroughly
- 7. Dip battered rings in breadcrumbs if desired
- 8. Fry 3-4 rings at a time for 1-2 minutes per side until golden
- 9. Remove with slotted spoon, drain on paper towels
- 10. Season with salt while hot
- 11. Serve immediately with dipping sauce
Notes
- Don’t overcrowd the pan – fry in small batches
- Keep oil temperature between 350-375°F for best results
- Use a thermometer – guessing leads to greasy rings
- Drain on paper towels immediately after frying
- Salt them hot right out of the oil
- Use sweet onions for best flavor
Storage And Reheating
You can store leftovers in an airtight container in the fridge for like a day. Reheat them in the oven at 350°F for like five minutes. Don’t use the microwave because they get soggy.
You can also freeze them raw before frying and just fry them frozen later. Adds like a minute to the frying time but they taste just as good.
Dipping Sauces That Matter
Ketchup is fine. But ranch is better. Some people do a mix of mayo and ketchup. Some people use like a fancy aioli or a spicy sauce.
Make your own dipping sauce or just use what you got. The onion rings are good enough that honestly they don’t even need sauce.
FAQ About Making Onion Rings
Can you use red onions instead? Red onions work but they’re spicier and don’t taste as good for onion rings. Sweet yellow onions are way better. Stick with those.
What if you don’t have cornstarch? You can skip it but they won’t be quite as crispy. Flour alone still works though. Just add more flour if you need to.
Can you make them in the oven instead of frying? Yeah spray the breaded rings with cooking spray and bake at 425°F for like 15-20 minutes. They’re not quite as crispy as fried but still pretty good.
How do you know when the oil is hot enough? Get a thermometer and aim for 350-375°F. If you don’t have one drop a tiny piece of batter in. If it sizzles immediately you’re good.
Real Talk
Making onion rings at home is incredibly easy and way better than restaurant versions. Seriously. Once you do it once you’ll never order them out again.
They taste better. They’re cheaper. You can make them whenever you want. There’s no reason not to do this.
Leave a Comment