
Butter tarts are one of those things that seems way harder than it actually is. You see them at bakeries looking fancy and think – yeah, I can’t make that. But honestly? You can. They’re actually pretty straightforward once you get the hang of them. Plus, they taste insane when they’re fresh.

These little things are straight-up Canadian. Not British. Not American. Canada. You go to Toronto, Montreal, Winnipeg – everyone has butter tarts. They’re the snack that shows up everywhere. School bake sales, coffee shops, family dinners, Christmas boxes. There’s probably a regional variation somewhere but the base stays the same – flaky pastry, gooey filling, done in like 20 minutes in the oven.
What Actually Goes Into Butter Tarts
The filling is stupidly simple. That’s the secret. You don’t need crazy ingredients. Just butter, brown sugar, egg, and a tiny bit of vanilla. Some people add raisins or walnuts. Some don’t. Both ways work.
The pastry is where people get nervous. But store-bought pastry sheets work fine if you don’t want to make it from scratch. Yeah, homemade is better, but don’t let perfect be the enemy of good. Even with store-bought pastry these taste amazing.
The beauty of butter tarts is that they’re forgiving. If your filling gets a tiny bit too thick or too thin, it still works. The pastry doesn’t have to be perfect. They just work.
The Ingredients You Need
For the pastry:
- 2 cups all-purpose flour
- 1 cup cold butter, cut into cubes
- 1/2 teaspoon salt
- 1 tablespoon sugar
- 4-5 tablespoons ice water
- 1 egg yolk (for brushing)
For the filling:
- 1/2 cup softened butter
- 1 cup brown sugar (packed)
- 1 egg
- 1 teaspoon vanilla
- Pinch of salt
- 1/3 cup raisins or walnuts (optional)
Quick notes: Use real butter, not margarine. Keep pastry butter cold. Pack brown sugar into the cup. Egg should be room temperature. Ice water has to actually be cold. That’s it.
Making The Pastry (Skip This If Using Store-Bought)
Okay so if you’re making pastry from scratch, here’s the deal. Your butter needs to be cold. Like actually cold. Put it in the freezer for 10 minutes if your kitchen is warm.
Mix flour, salt, and sugar in a bowl. Add your cold butter chunks.
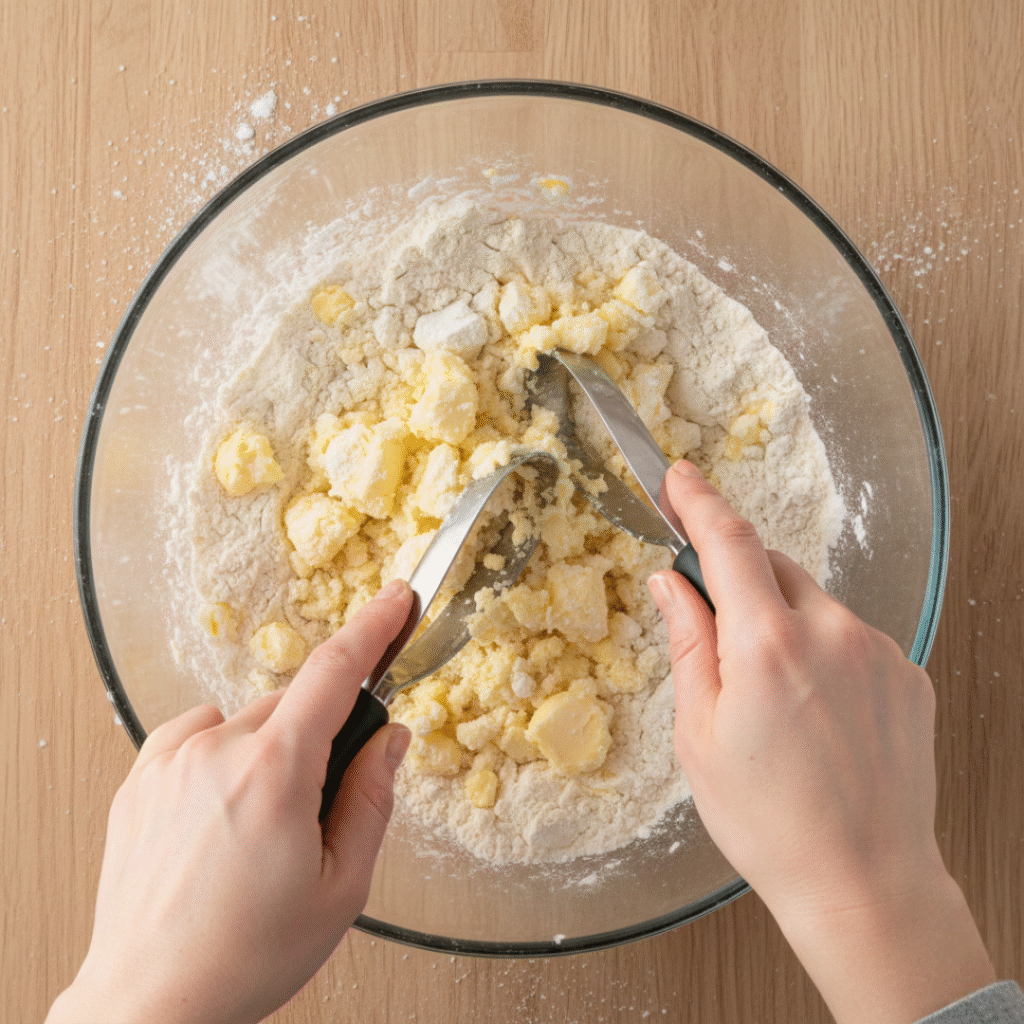
Use a pastry cutter or just your fingers to break everything up until it looks like breadcrumbs. Don’t overmix or your pastry will be tough instead of flaky.
Add ice water one tablespoon at a time until the dough comes together. You want it to hold together but not be wet. If it’s sticky, you’ve added too much water. Stop there.
Form it into a ball, wrap it in plastic, and stick it in the fridge for like 30 minutes. This is important because it relaxes the gluten and makes rolling easier. Also makes the pastry flakier.
Pro tip: Cold dough is way easier to work with. Don’t rush this step.
Rolling And Cutting
Dust your counter with flour so the dough doesn’t stick. Roll it out to about 1/8 inch thick. Not paper-thin but not thick either. Just even.
Use a glass or pastry cutter – something about 3 inches across – and cut circles. You need enough for your muffin tin. If you have a 12-cup tin, cut 12 circles. Maybe cut extras because why not.
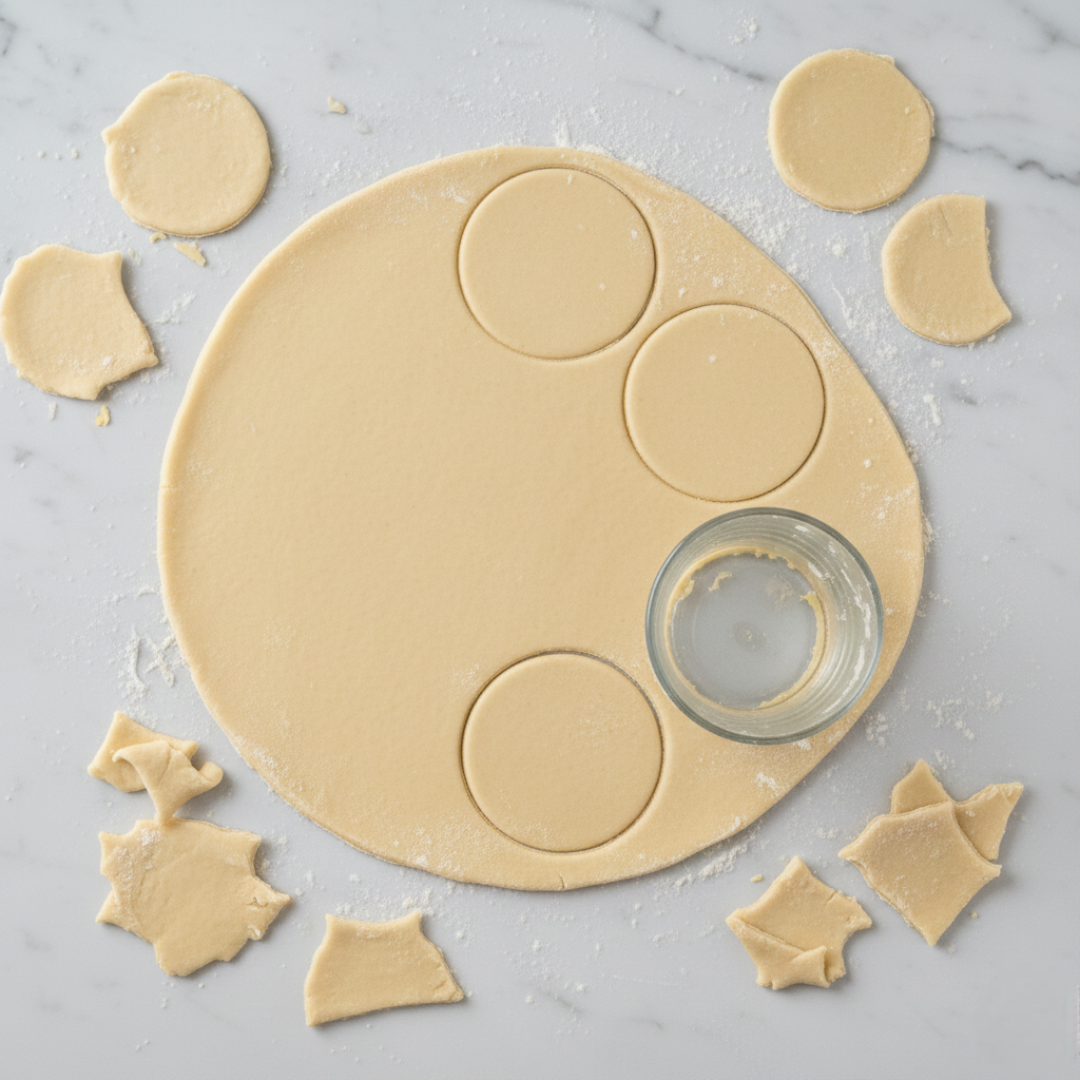
Gently press each circle into the muffin cup. You want them to go up the sides a bit but not perfectly. They’re supposed to look rustic. Push them down gently with your thumb so they fit snug. The pastry will naturally come up higher in some spots than others. That’s fine. That’s good actually.
Pro tip: If your pastry breaks, just press it back together. It’s forgiving. Nobody will know.
Making The Filling
This is where it gets easy. Cream the softened butter and brown sugar together. Use a mixer or just do it by hand with a spoon. Mix until it looks light and fluffy. Like 2-3 minutes.
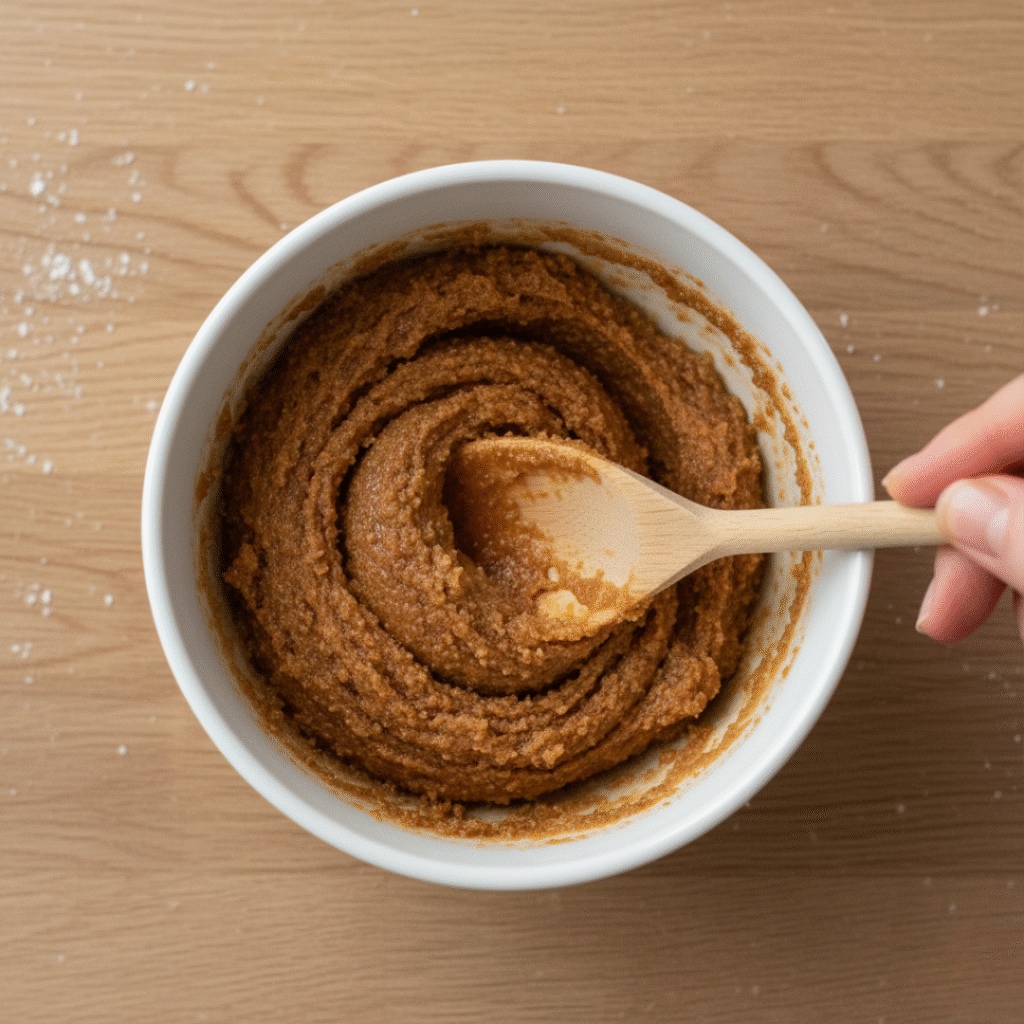
Crack an egg into a bowl, beat it lightly, and add it to the butter mixture. Mix it in. Add vanilla and salt. That’s it. You’re done with the filling base.
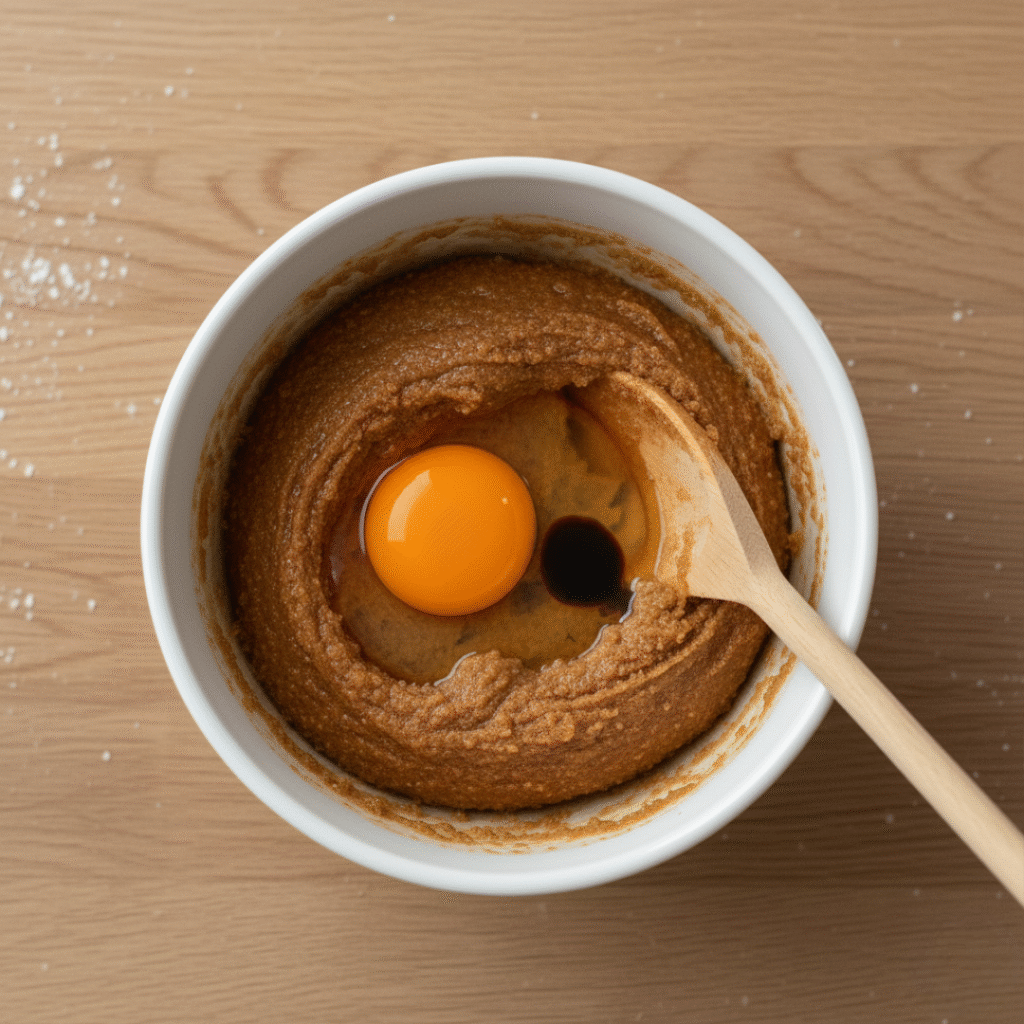
If you want raisins or walnuts, toss them in now. Mix it through.
Pro tip: Let the egg come to room temperature before adding it. Cold egg is harder to mix in smoothly. It’s not a big deal but it helps.
Filling The Tarts
Here’s the thing about filling – you want enough that it’s gooey but not so much that it overflows. Each tart gets like a heaping teaspoon. Maybe a bit more. That’s it.
Use a small spoon or an ice cream scoop – one of those tiny ones – to fill each tart. Don’t be shy with it. The filling rises a bit while baking but not crazy amounts.
Beat an egg yolk with a splash of water and brush the edges of the pastry. This makes the top golden and shiny.
Pro tip: Underfill slightly if you’re nervous. You can always make a second batch and they’ll still taste incredible.
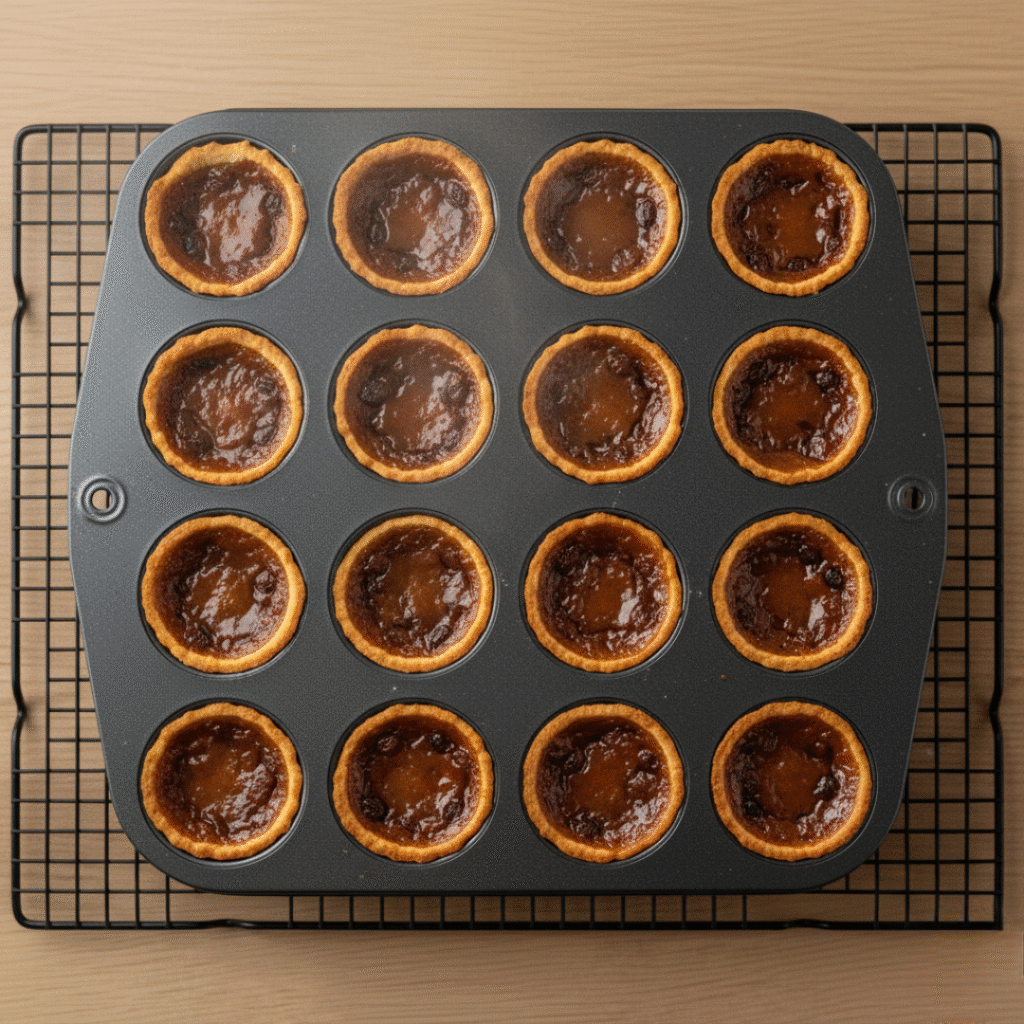
Baking Them
Heat your oven to 400°F. Pop your filled tarts in there.
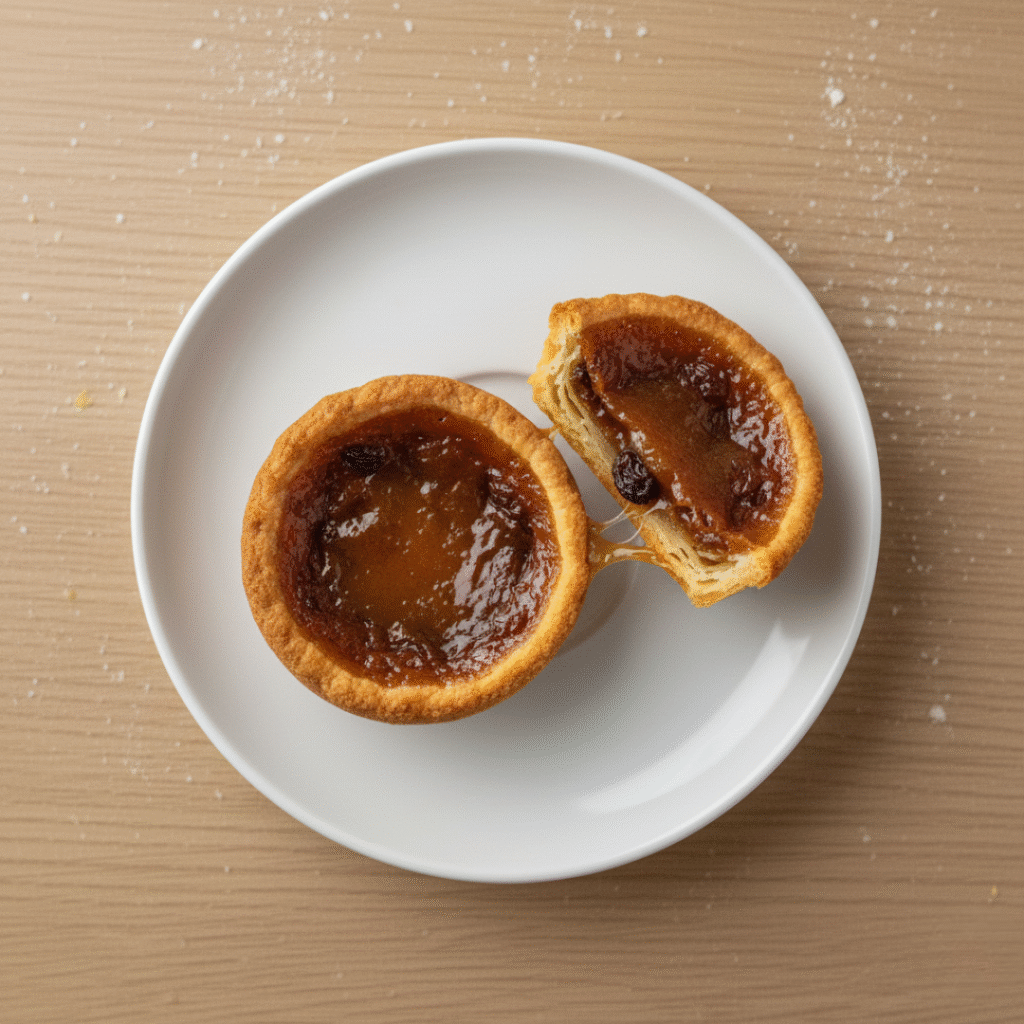
They’ll bake for 12-15 minutes. You’re looking for the pastry to turn golden brown and the filling to be bubbly around the edges. The very center of the filling should jiggle slightly when you shake the tin. That’s how you know it’s done.
Don’t overbake or the pastry gets hard and the filling gets thick instead of gooey. Slightly underbaked is actually better with butter tarts. They firm up as they cool.
Let them cool in the tin for like 5 minutes. They’ll still be hot and the filling will still be liquidy but that’s perfect. Then pop them out gently and let them sit on a rack.
Pro tip: If you can’t wait 5 minutes and burn the roof of your mouth, that’s on you. These things are hot. Let them cool a bit.

How to Make Butter Tarts: Easy Canadian Recipe Guide 2025
Equipment
- Muffin tin (12-cup)
- Pastry cutter or glass (3 inches wide)
- Baking sheet
Ingredients
- Store-bought pastry sheets OR homemade pastry flour, butter, salt, sugar, ice water
- ½ cup softened butter
- 1 cup brown sugar
- 1 egg plus 1 yolk for wash
- 1 tsp vanilla
- Pinch of salt
- ⅓ cup raisins optional
INSTRUCTIONS
- 1. Prep pastry – use store-bought or make from scratch and chill 30 minutes
- 2. Cut circles and press into muffin tin
- 3. Mix butter and brown sugar until fluffy
- 4. Add egg and vanilla
- 5. Fill each tart with a heaping teaspoon of filling
- 6. Brush pastry edges with egg yolk wash
- 7. Bake at 400°F for 12-15 minutes until golden
- 8. Cool 5 minutes in tin
- 9. Transfer to rack
- 10. Serve at room temperature
Storage And Keeping Them Fresh
Butter tarts stay good for like 4-5 days if you keep them in an airtight container. They get slightly firmer as they sit but that’s not bad. Some people prefer them that way.
You can also freeze them. Cool them completely, stick them in a freezer bag, and they’ll keep for a couple months. Reheat them in the oven at 300°F for like 5 minutes and they taste almost fresh again.
Don’t put them in the fridge. Cold makes the pastry hard and it takes forever to soften up. Room temperature or frozen is your move.
Pro tip: Make them the night before if you’re serving them at something. They actually taste better the next day. The flavors settle in and the pastry gets less greasy.
Other Recipes Using The Same Pastry
The pastry works for other stuff too. Meat pies. Fruit tarts. Pies obviously. Anything that needs a flaky pastry base.
Butter tart squares are a thing – you make the same filling but in a 9×9 pan instead of a muffin tin. Cut them into squares. Easier than individual tarts and they taste the same.
Pecan tarts use the same pastry and filling but substitute pecans for the raisins. Some people add a touch of maple syrup to the filling too.
Cream cheese tarts swap some of the butter for cream cheese. Totally different flavor but still amazing.
The base is flexible. Mess with it.
Common Questions People Ask
Can you use frozen pastry? Yeah, totally. Thaw it first. It works fine. You’re not making a French pastry, you’re making butter tarts. Don’t stress.
What if my filling leaks? It happens. It’s fine. The tart still works. Just clean it off the bottom of the tin after baking.
Can you make these ahead? Totally. Fill them and stick the tin in the fridge overnight. Bake them the next day. The pastry gets even better because it’s rested longer.
Why is mine runny? You either underbaked it or didn’t cook it long enough. Next time bake an extra minute or two. Also check your oven temperature – some ovens run cold.
Can you make them without raisins? Yes. They’re better without them honestly. Some people hate raisins in tarts. Do what you want.
What if I overfill them? The filling goes everywhere. Don’t do that. A heaping teaspoon per tart is the move.
Tips For Perfect Butter Tarts
Use real butter. Don’t use margarine or that fake stuff. Real butter is why they taste good.
Keep things cold. Cold pastry, cold butter, ice water. Temperature matters with pastry. If your kitchen is hot, chill your bowl and utensils too.
Don’t overwork the dough. Mix it just enough to come together. Overworking makes tough pastry. You want it flaky and tender.
Taste the filling before baking. Just a tiny bit. Make sure it’s sweet enough for you. Everyone’s different.
Watch them toward the end. Ovens vary. Check at 12 minutes. If they need more, give them 2-3 more minutes. Done is done.
Room temperature is your friend. Serve them at room temperature. Warm is okay but if they’re too hot the filling is too runny. Too cold and everything hardens up.
Make extra. These things disappear fast. You think you made enough. You didn’t.
Why These Are So Good
Butter tarts work because they’re simple. No weird techniques. No fancy equipment. No ingredients that are hard to find.
They’re also weirdly satisfying to make. You’re not standing over them for hours. You mix some stuff, fill some pastry, bake them. 30 minutes from start to finish if you use store-bought pastry.
And they taste incredible. That gooey filling mixed with the flaky pastry and maybe some raisins – it’s just right. Not too sweet. Not too rich. Perfect with coffee or tea.
The fact that they’re so Canadian matters too. Making butter tarts is like a national thing. Everyone has their way of doing them. Someone’s grandma’s recipe is slightly different from someone else’s. But they all work.
Final Thing
Don’t overthink these. Seriously. People make butter tarts in home kitchens every day. Bakeries make thousands. If you can measure ingredients and use an oven, you can make butter tarts.
Your first batch might not be perfect. That’s okay. They’ll still taste good. Your second batch will be better. Keep making them and you’ll get better each time.
Plus, the worst-case scenario is you have to eat failed butter tarts. Which honestly doesn’t sound like a bad day.
Leave a Comment