
There’s something about biryani that just hits different, you know? Whether you’re eating karahi, trying some butter chicken, enjoying nihari, or munching on kababs – they’re all great. But biryani? That’s on another level. When someone’s making biryani on a Sunday, the whole neighborhood knows. That smell just travels and makes everyone hungry. Today we’re making that authentic chicken biryani that tastes just like what you get at your favorite restaurant.
Why Biryani Is So Special
Look, pulao is nice, qorma hits the spot, but biryani is something else entirely. The way those spices smell, how fluffy the rice gets, and that tender chicken – everything just works together perfectly. Weddings, Eid celebrations, birthday parties, or just a regular Sunday lunch – biryani makes every occasion feel special.
A lot of people think making biryani at home is too complicated. Sure, it takes some time, but if you know the right method, it’s actually pretty straightforward. You just need to follow the steps carefully and have a bit of patience.
What You’ll Need
Before we start cooking, let’s get everything ready. When you have all your ingredients prepared, the actual cooking becomes so much easier.
For the Chicken and Main Ingredients:
- 1 kg chicken (cut into pieces)
- 3 cups basmati rice
- 3 large onions (thinly sliced)
- 4 tomatoes (chopped)
- 4-5 green chilies (slit)
- Half cup yogurt (whisked)
- 2 tablespoons tamarind pulp
- Half cup oil or ghee
- Fresh coriander and mint (half cup)
- 2 tablespoons ginger-garlic paste
Whole Spices:
- 5-6 green cardamom pods
- 4-5 cloves
- 2 black cardamom
- 1 cinnamon stick
- 1 bay leaf
Ground Spices:
- 1 teaspoon red chili powder
- Half teaspoon turmeric powder
- 1 teaspoon cumin powder
- 1 tablespoon coriander powder
- 1 teaspoon garam masala
- Salt to taste
For Garnishing:
- Food color (orange or yellow)
- Fried onions
- Kewra water or rose water (if available)
How to Make Perfect Biryani
Step 1: Heat the Oil and Fry Onions
First things first – grab a heavy-bottomed pot or deep pan. Add half cup of oil or ghee and heat it on medium flame. Let the oil get properly hot but don’t let it smoke.
Once the oil is ready, add your thinly sliced onions. This step is super important because onions give biryani that golden color and sweet flavor. Keep stirring with a spoon so the onions brown evenly on all sides.
You need to cook the onions for at least 12-15 minutes. They’ll start white, turn light golden, and then get nicely browned. Don’t rush this – if the onions aren’t properly browned, your biryani will lose half its taste.
Step 2: Add the Chicken and Sauté
When the onions are nicely browned, it’s time to add the chicken pieces. Turn the flame up a bit and mix the chicken with the onions. The chicken needs to get sealed on all sides, meaning its color should change slightly.
At this stage, let the chicken cook for 5-7 minutes. Water will start coming out of the chicken – that’s completely normal. Let this water dry up and let the chicken fry properly. Keep stirring so nothing sticks to the bottom.
Step 3: Add Whole Spices
Now it’s time for the whole spices. Add all your cardamom, cloves, black cardamom, cinnamon, and bay leaf. The magic of these spices is how they spread their aroma throughout the entire curry.
Let them cook for 2-3 minutes. When you start smelling their strong fragrance, you know they’re ready for the next step. The spices shouldn’t burn, just get lightly roasted.
Step 4: Tomatoes and Green Chilies
After the whole spices, add your chopped tomatoes. Also add those slit green chilies. Cooking the tomatoes properly is really important, otherwise the curry will taste sour.
Cook the tomatoes on medium flame for 7-8 minutes. Keep mashing them with your spoon so they break down well and the oil separates. When the tomatoes become paste-like and the oil comes to the top, you know it’s perfect.
Step 5: Add Ground Spices
Now add all the ground spices – red chili, turmeric, cumin powder, coriander powder. These need to cook with the masala mixture for about two minutes. If you add spices and don’t cook them, they’ll smell raw.
You can sprinkle a little water so the spices don’t burn. When the spices are well cooked and the oil separates from the masala, you’ve done it perfectly.
Step 6: Adding Tamarind and Yogurt
When the chicken has cooked a bit (after 10-12 minutes), now add the tamarind pulp. Tamarind brings that tangy taste that’s the signature of traditional biryani. Let it cook for 3-4 minutes.
After this, add the whisked yogurt. Add the yogurt little by little and keep stirring quickly so it doesn’t curdle. If you add it slowly and keep stirring, the yogurt will blend in perfectly.
Check the salt and adjust if needed. Now cover the chicken and let it cook on dum for 15-20 minutes. The chicken should be 80-90% cooked because it’ll cook more with the rice later.
Step 7: Cook the Rice Separately
While the chicken is cooking, you can start the rice. In a separate large pot, add plenty of water – at least 6-7 cups. Add 2 tablespoons of oil to the water and some salt too.
Add 3-4 whole cardamom, 2-3 cloves, and one bay leaf to the water and bring it to a boil. When the water reaches a rolling boil, add the washed rice.
This point is really important – cook the rice only 70%, meaning it should stay a bit undercooked. When you press a grain between your fingers, it should feel slightly hard in the center. This usually takes 5-6 minutes. Quickly drain the rice and set it aside.
Step 8: The Art of Layering
Now comes the fun part – layering. Take that pot where your chicken curry is ready. If there’s too much water in the curry, cook it uncovered for 5 minutes to let some water evaporate.
First, level out the curry. Now add the first layer of rice – half the rice goes here. Spread the rice gently, don’t press it down.
Sprinkle some fried onions on top of the rice. Add some fresh coriander and mint too. Now take a small bowl with some milk and add a pinch of food color and mix. Sprinkle this colored milk here and there – this gives biryani that restaurant-style color.
Add the second layer with the remaining rice. Again add fried onions, coriander and mint. If you have kewra water, add a few drops. You can also add 2-3 tablespoons of ghee on top for extra richness.
Step 9: The Dum Process
This is the last and most important step. Cover the pot with aluminum foil, then put the lid on tight. This double sealing keeps the steam inside.
First, keep it on high flame for 2-3 minutes so steam starts building up. Then turn the flame as low as possible. You can place a flat pan or tawa between the flame and pot – this prevents anything from burning at the bottom.
Now let it cook on dum for 25-30 minutes. Don’t open the lid in between, otherwise all the steam will escape and your biryani won’t turn out right. Just sit back and enjoy the amazing smell filling your kitchen.
Step 10: Serving Time
When the time is up, turn off the flame but don’t open the lid yet. Wait another 10 minutes. This is the settling time for the biryani.
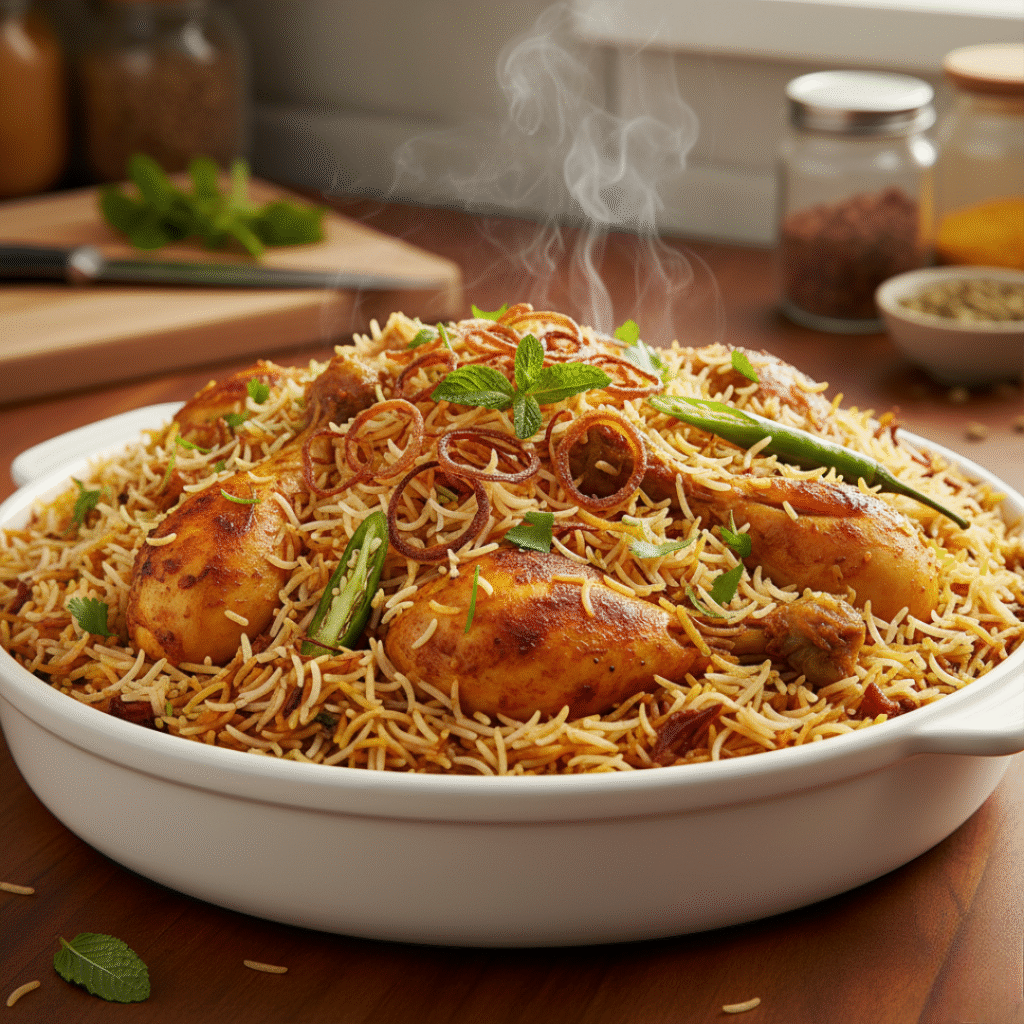
Then gently open the lid and look – fluffy, colorful, fragrant biryani is ready. Mix gently with a fork so the chicken from the bottom comes to the top. Be careful not to break the rice grains.

Mouthwatering Chicken Biryani with Flavorful Spiced Rice
Ingredients
Main Ingredients:
- 1 kg chicken cut into pieces
- 3 cups basmati rice
- 3 large onions thinly sliced
- 4 tomatoes chopped
- 4-5 green chilies slit
- ½ cup yogurt whisked
- 2 tbsp tamarind pulp
- ½ cup oil or ghee
- ½ cup fresh coriander and mint
- 2 tbsp ginger-garlic paste
Whole Spices:
- 5-6 green cardamom
- 4-5 cloves
- 2 black cardamom
- 1 cinnamon stick
- 1 bay leaf
Ground Spices:
- 1 tsp red chili powder
- ½ tsp turmeric powder
- 1 tsp cumin powder
- 1 tbsp coriander powder
- 1 tsp garam masala
- Salt to taste
For Garnish:
- Orange/yellow food color
- Fried onions
- Kewra or rose water optional
INSTRUCTIONS
- Fry Onions: Heat oil in a heavy pot. Add sliced onions and fry for 12-15 minutes until deep golden brown. Remove half and set aside for garnishing.
- Cook Chicken: Add chicken pieces to the same oil. Sauté on high heat for 5-7 minutes until sealed and water evaporates.
- Add Whole Spices: Add cardamom, cloves, black cardamom, cinnamon, and bay leaf. Cook for 2-3 minutes until fragrant.
- Add Tomatoes: Add chopped tomatoes and green chilies. Cook for 7-8 minutes until tomatoes are fully mashed and oil separates.
- Add Ground Spices: Add red chili, turmeric, cumin, coriander powder. Cook for 2 minutes, stirring continuously.
- Add Tamarind and Yogurt: After 10-12 minutes, add tamarind pulp and cook for 3-4 minutes. Then add whisked yogurt gradually while stirring. Add salt. Cover and cook for 15-20 minutes.
- Prepare Rice: Boil 6-7 cups water with 2 tbsp oil, salt, and whole spices. Add washed rice and cook until 70% done (5-6 minutes). Drain immediately.
- Layer the Biryani: Spread half the rice over the chicken. Sprinkle fried onions, herbs, and food color mixed in milk. Add remaining rice and garnish again. Add kewra water if using.
- Dum Cooking: Cover pot with foil and tight lid. Cook on high for 2-3 minutes, then reduce to lowest heat. Place a tawa underneath. Cook for 25-30 minutes.
- Rest and Serve: Turn off heat and let rest for 10 minutes. Open lid, gently mix with a fork, and serve hot with raita and salad.
Notes
- Don’t skip browning onions properly – they add essential flavor
- Rice should be 70% cooked only, not fully done
- Keep flame very low during dum process
- Fresh chicken gives better results than frozen
- Adjust spice levels according to preference
How to Serve
Transfer the biryani to a large serving dish. Garnish with remaining fried onions and fresh coriander on top. Serve with raita – cucumber and mint raita goes perfectly with biryani.
Also keep some salad on the side – onions, cucumber, tomatoes, lemon. Some people also like pickle with it.
Tips That Will Help
Always wash the rice until the water runs clear. This removes extra starch and prevents the rice from sticking.
Chicken should be fresh. Frozen chicken makes a difference in taste.
Brown the onions properly – they’re the soul of biryani. Light golden onions won’t work.
Keep the flame very low when cooking on dum. If it’s too high, the bottom biryani will burn.
If your pot lid isn’t tight, you can seal the edges with dough paste.
Why This Biryani Will Be a Success
Every step in this recipe is clear and tested. First adding oil, then onions, chicken, spices – this traditional sequence gives the right taste. The timing of adding tamarind and yogurt is also important – add them too early and the spices won’t develop flavor, add them too late and the chicken won’t marinate properly.
Cooking the rice and chicken separately and then combining them on dum – this technique is what makes biryani different from pulao. The steam from dum brings all the flavors together and makes every grain, every piece taste perfect.
Final Thoughts
Making biryani at home isn’t rocket science. Yes, it takes some time and effort, but when you serve your homemade biryani and everyone praises it, that feeling is just different. The first time might seem a bit difficult but as you make it more, you’ll get the hang of it.
Every home’s biryani is a bit different. Some people like it more spicy, some like it mild. Some add more masala, some keep it light. That’s all fine – making biryani is also an art and every chef adds their own touch.
So what are you waiting for? Make this amazing biryani for your family this weekend. Watch how everyone licks their fingers!